A tape measure once turned a vintage Levi's 501 into a six-minute exercise for our team. The waist read 32, then 33, then 32 again. The inseam missed by half an inch on every pass. By the third measurement, we'd handled the fabric enough that it had visibly stretched.
That's why the iPhone shutter on Size AI fires once, registers a depth map, runs an edge-detection model, and lands 15+ measurement points in 0.92 seconds. No tape. No second pass. Almost no contact with the cloth.
What follows is the capture flow we ship today, why it works, and the handful of mistakes we still see most often.
What capture actually does
Set a garment flat on a contrasting surface and the LiDAR sensor on your iPhone gets a clean depth read. Size AI projects invisible infrared dots across the fabric and times their bounce-back to build a millimeter-resolution depth map. An on-device edge-detection model then walks that depth map looking for the geometry that matters: shoulder seams, hem lines, collar arcs, sleeve cuffs, waistbands.
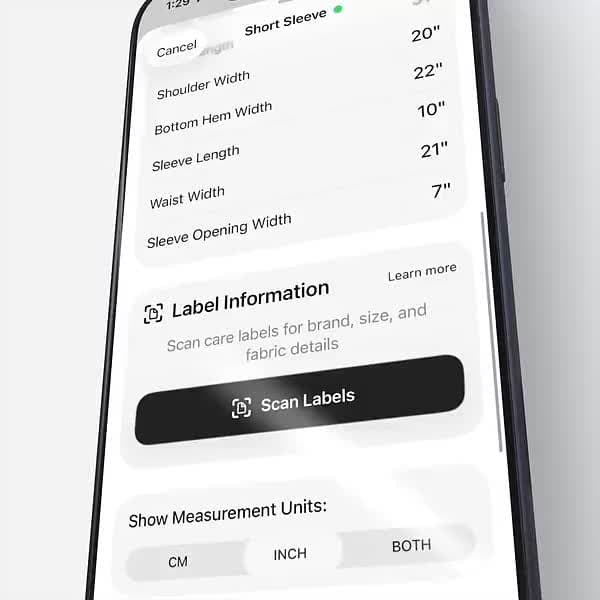
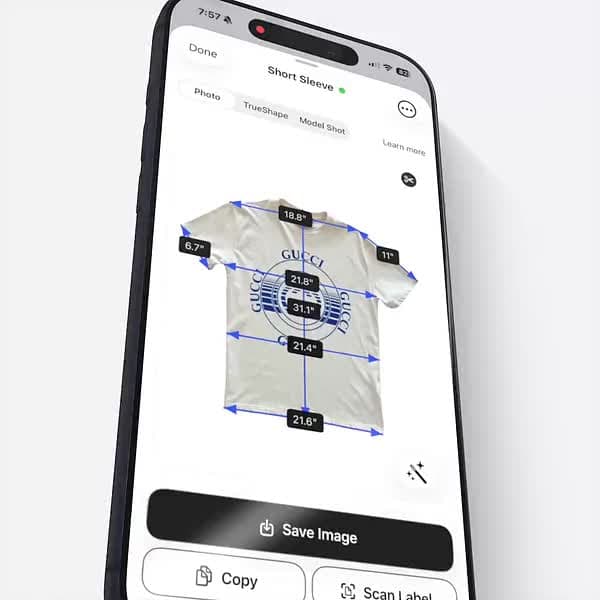
A single capture lifts more than 400 structured data points off the garment. From those, the app surfaces 15+ user-facing measurements. Tank tops get fewer. A tailored blazer gets the full set: chest, waist, length, sleeve, shoulder, plus a handful of category-specific ones.
The whole pipeline runs on the device. Your photos never leave your phone for the measurement step, which is why capture works in a thrift-store basement with no signal. Shutter tap to a screen full of measurement arrows: 0.92 seconds.
What you need before you tap shutter
You need a Pro-line iPhone with LiDAR. That's iPhone 12 Pro or 12 Pro Max all the way up through iPhone 17 Pro and 17 Pro Max. iPad Pro 11" and 12.9" from 2020 onward also work. The non-Pro iPhones (regular 12, 13, 14, 15, 16, 17) don't have a LiDAR sensor and won't run the app.
Beyond the device:
- A flat surface big enough to hold the garment without folding
- Even lighting. Daylight is best. Overhead lamps work. Side-light from a single window does not.
- A background that contrasts with the garment. Light fabric on dark surface, or vice versa.
- For oversized pieces, room to back up to roughly 1.4 meters (4.6 feet)
Without contrast, the edge-detection model struggles. A light-grey hoodie on a light-grey hardwood floor is the weakest setup we've seen. The same hoodie on a black sheet reads cleanly.
How to capture a garment
This is where most resellers think they already have the process down. They don't. The same five mistakes show up across thousands of support tickets.
- 1
Lay the garment flat. Floor, table, lay-flat board, choose the largest option. Smooth the fabric so nothing is bunched, twisted, or overlapping. For pants, keep the inseam dead straight. For jackets, button or zip them closed before they go down. An open jacket captures wider than the jacket actually is, every time.
- 2
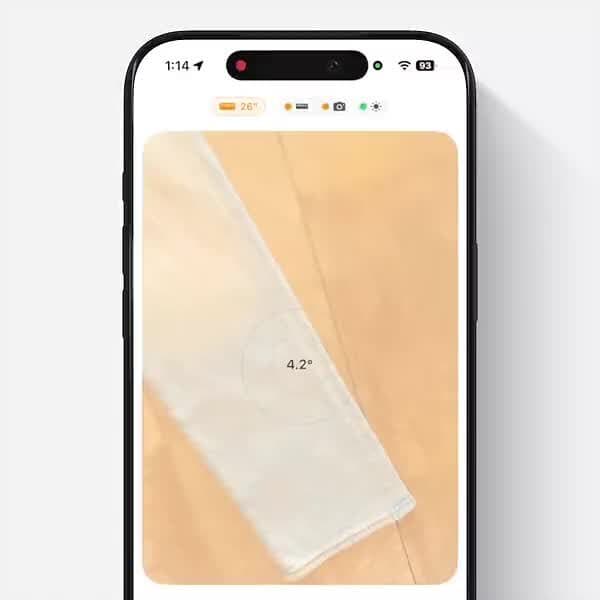
Turn on Precision Guidance in the camera view. The app shows real-time angle indicators that change color as you tilt. Hold the phone directly above the garment until everything reads green. Green means 90 degrees, the angle the LiDAR sensor needs for a clean depth read. Anything less and the depth values distort.
- 3
Smooth out major wrinkles. Small fabric texture is fine. Major folds and creases shift measurements by 0.8–1.2 in (2–3 cm), enough to push a buyer into the wrong size and trigger a return. Heavy denim and canvas benefit from a quick steam. Lightweight knits and jersey usually smooth by hand.
- 4
Tap the shutter. Capture finishes in 0.92 seconds. The measurement arrows appear on screen automatically.
- 5
Verify the arrows. Check where each one lands. If the chest arrow sits on a wrinkle instead of the seam, the measurement is wrong. Retake the photo, or open the Precision Editor and drag the keypoint into place.
End to end, the flow takes 30 to 60 seconds per garment once it becomes familiar. The first day feels slow. By the second week, it's faster than any tape measure you've ever used.
Tips that actually move the needle
The advice we give most often, in roughly the order it matters:
- Distance is everything. Stay between 0.7 and 1.4 meters (2.3 to 4.6 feet) from the garment. The app shows a distance indicator on the right side of the viewfinder. Green means ideal. Orange means adjust. Outside that range, the LiDAR data starts to degrade.
- Stand straight up, not at an angle. Shooting on the floor? Stand and shoot straight down. Don't kneel and angle in. Once the phone moves off 90 degrees, the depth read distorts and the measurements drift.
- Use a clean, solid background. Wood, poster board, a single-color sheet. Skip busy patterns. Edge detection on a polka-dot bedspread is the kind of thing that ruins your afternoon.
- For oversized garments, step back. If a coat doesn't fit in the frame at 1.4 meters, walk back farther. The app adjusts measurements based on the actual capture distance, so backing up doesn't hurt accuracy. Cropping the frame does.
- Retake before you edit. Two or more arrows misplaced? A fresh capture is faster than dragging keypoints by hand. Save the Precision Editor for fine-tuning a single arrow that's a millimeter off.
Common questions
Which iPhones support Size AI?
Any iPhone Pro or Pro Max from iPhone 12 onward, which covers iPhone 12 Pro through iPhone 17 Pro Max. The non-Pro line doesn't have a LiDAR sensor and won't run Size AI. iPad Pro 11" and 12.9" models from 2020 and later also work.
How accurate are Size AI measurements?
3⁄16" – 3⁄8" (5–9mm) typical in ideal conditions, with the best measurements landing within 4–5mm when the garment is flat, the lighting is even, and the camera is at 90 degrees. Full-length measurements like body length run higher until their dedicated refinements ship. Across more than 1 million captures, fashion sellers using Size AI cut return rates from the industry-average 24.4% to 5.5%.
Can I use Size AI without an internet connection?
Yes. Measurement and label scanning both run on-device, so you can capture in a thrift store, a warehouse, or anywhere with no signal. Cloud features like AI Photo Studio need a connection, but the core measurement flow doesn't.
What if the measurement arrows look wrong?
Two options. Retake the photo if more than one arrow is off (faster, recommended). Or open the Precision Editor and drag the keypoints into place if it's just one. Most arrow errors trace back to wrinkles, an angled camera, or a busy background. Fix the setup and the next capture usually lands.
Can I switch between cm and inches?
Yes. The Unit Conversion power feature lives in Settings. Toggle once and every measurement displays in your chosen unit going forward. The full set of utilities lives in our workflow tools guide.
The mistakes we still see
After more than a million captures, the same handful of issues drive most of our support tickets. The garment isn't quite flat. The camera is six inches off 90 degrees. The background is too close in tone to the fabric. None of them are subtle. They're all obvious in the verification screen if you bother to look. They all go away the moment the setup is fixed.
That's the whole pitch on capture. The technology is real, the math is real, and a reseller can shoot a hundred garments in an afternoon once the fundamentals are in place.
Related
- TrueShape generates a clean product photo from the same capture, automatically, in 1 to 2 seconds.
- See every supported garment type. 92 categories, from t-shirts to maxi dresses.
- Building a marketplace, retail tech stack, or a fit-data layer? Talk to our team about API and SDK access.